A Question for the BizTalk Guys over at the PDC….

Gents,

I’ve been reading all about Azure and Oslo, but I’ve yet to read anything concrete about Dublin – are you guys picking up any detail on what it will offer? Have you seen any demos on actual usage?

Cheers, Nick.

Update: May have answered my own question with a bit more research: Darren Jefford and Maina Donaldson have good explainations over on their blogs.

Writing Unit Tests for Pipeline Components with NCover

I discovered NCover over the weekend and wow, am I a fan!

NCover is a code coverage tool which, to quote the website, “helps you test intelligently by revealing which tests haven’t been written yet.” In laymans terms, NCover graphically shows you which lines of code were not touched during the execution of your unit tests, allowing you to create tests accordingly to achieve 100% code coverage, as shown below:

Pipeline Component Testing

Armed with Tomas Restrepo’s excellent Pipeline Testing library, we can now comprehensively test our Pipeline Components:

1. Develop units tests to test your pipeline and ensure that the tests execute and are successful;

2. Invoke your testing framework from the command line to check that your tests will run correctly in the NCover environment (I’m using NUnit here, but you could also invoke VSTS):

"C:Program FilesNUnit 2.4.8binnunit-console.exe" BizTalkMessageArchivingComponent.Tests.dll

Which should produce the following output on the command line:

3. With our unit tests successfully executing, we can wrap the NUnit invocation in NCover loveliness which will inspect our code coverage while those tests executed:

ncover.console "C:Program FilesNUnit 2.4.8binnunit-console.exe" BizTalkMessageArchivingComponent.Tests.dll //ea Modhul.BizTalk.Pipelines.ArchiveMessages.Attributes.NCoverExcludeCoverage //et "Winterdom.*;BizTalkMessageArchivingComponent.Tests.*"

Producing command-line output similar to the following (notice the NUnit tests running between the ***Program Output*** and ***End Program Output*** text):
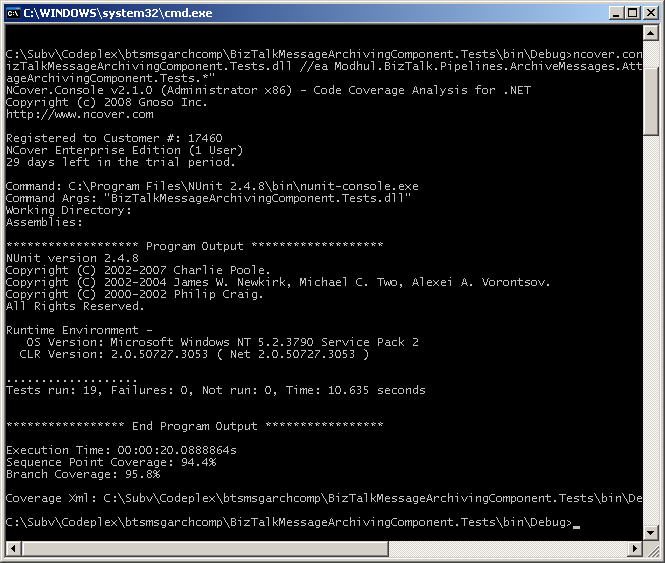
NCover has now determined the code coverage based of your unit tests and produces a Coverage.Xml file. This file contains information relating to the code coverage and can be loaded in the NCover.Explorer tool to produce a VS like environment that displays lines of code that were touched and un-touched by your unit tests.

4. Load the NCover.Explorer tool and open the Coverage.Xml file generated above, you will be presented with a screen detailing your code coverage. In the example below, you can see that the PerformImmediateCopy and StreamOnReadEvent methods do not have full code coverage – both have code which was not executed in our unit tests:
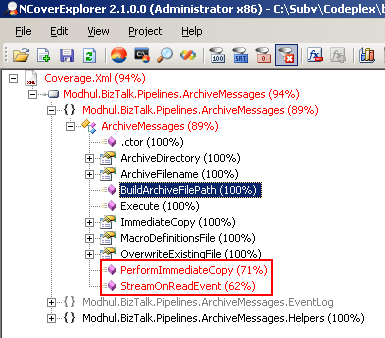
Clicking on one of the methods in the tree view loads the offending method, displaying the lines which were not executed by our tests in red; lines that were executed are displayed in blue:

Based on this information, we can now create tests to cater for these exceptions, ensuring we have 100% code coverage.

NCover is an excellent tool and although it isn’t free, I personally think its a must-have for any developers tool-kit.

Re-sizing a VirtualBox Virtual Disk Image File

Update 17th April 2009: This post has been updated to include the latest suggestions posted to the comments, including using the gparted Live CD instead of the Gentoo Linux System Rescue CD.

In my previous post I extolled the virtues of Sun’s desktop virtualisation software, VirtualBox. One thing niggled me though – I couldn’t easily expand a Virtual Disk Image (VDI) and was regularly reaching the space limits of the modest 20Gb disks I was creating; I needed an easy way of expanding disks before I could use it as my main virtualisation platform and felt comfortable in recommending it to my readers.

Given that there is very little information out there on how to perform this task – apart from a single obscure forum post – here is my attempt to walk you through the process of expanding a virtual disk image. This guide assumes that you are trying to expand a disk configured with Windows, however the procedure should be pretty much the same for a Linux/OpenSolaris etc. based disk.

Getting Started

  • Ensure that the Virtual Machine that uses the disk you want to re-size is shutdown.
  • Remove any snapshots you may have – VirtualBox can go a bit wonky when re-sizing a VDI with snapshots attached (thank to Darren for pointing this one out).
  • Take a backup of your VDI that you want to resize (by copying and pasting the .vdi file in Windows Explorer) – if we mess our resize up we can recover back to this backup.
  • While the VDI file is copying, download the latest stable release of the gparted Live CD ISO from Sourceforge (approx 95Mb).
  • While the ISO is downloading, create a new empty Virtual Disk in the VirtualBox console that is the size of the larger disk you need.
  • Attach the new disk to your virtual machine that needs its disk expanding as the slave disk.
  • Once the System Rescue CD download has completed, mount the ISO on the virtual machine CD drive.

Starting the Disk Image Utility

  • Boot the virtual machine from the mounted ISO – you may need to reconfigure your VM to ensure that you boot from the CD-ROM drive before the HDD, so change the VM settings as shown below or hit F12 at boot and change there (given that VirtualBox is currently under development, the screenshot below will always be out of date, but I’m sure you get the idea ;-):

virtualboxbootorder

  • During the boot process the gparted Live CD will prompt you to select the correct keymap – if you are using a QWERTY keyboard, simple select the ‘Don’t Touch Kepmap’ option; next, you will be prompted for the language settings to be used – select the appropriate language code, in my case ’02’ for British English; finally, you will be prompted for the X-Windows mode – select ‘0’ to automagically start gparted in an X-Windows session.
  • Once gparted starts, you will be presented with a graphical representation of your disks – left-click the left-to-right bar named /dev/sda1 (your primary hard disk that is to be expanded) and then click on the Copy icon.
  • Select the drop-down-box to the right of the tool-bar and select the second (currently empty) disk – /dev/sdb (possibly /dev/hdb in your environment), the graphical representation of your disks will change to show you the second slave disk which is currently empty. Click on the Paste icon.
  • gparted will will prompt you that all data on the new partition will be erased and if you’re happy, subsequently prompt you on how the disk should be formatted. For a Windows environment, select MSDOS (this will give you an NTFS partition, trust me!).
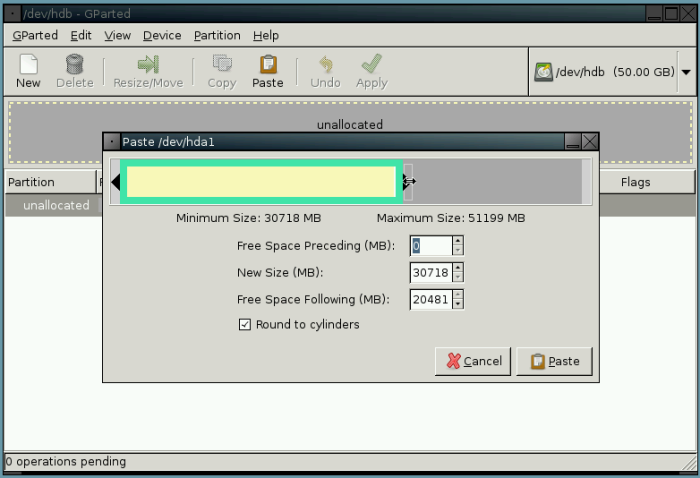
  • gparted will finally present you with a slider dialog indicating the desired size of the new disk. Drag the slider to the right to select the maximum size of the new partition on this new disk (I’d just drag it so the partition consumes the whole disk), as shown in the screenshot below:

selectsizeofnewpartitiongparted

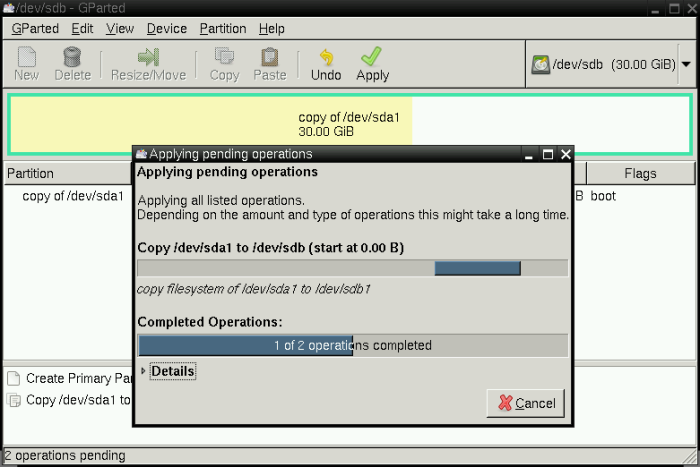
  • Click the Apply icon, you’ll be presented with something along the lines of the screenshot below as the contents of the source disk are copied to the new, larger, disk:

  • Once the copy has completed (approx. 35 mins to create a 30Gb disk from an original 20Gb disk), you will need to mark the new disk as bootable (if this is to be a bootable partition – if not, simply skip the next step).
  • To mark the partition as bootable, right-click the graphical representation of the new disk and left-click Manage Flags. In the dialog that appears, select Boot and click Ok to close. gparted will apply the necessary flag and re-scan your disks.
  • Close gparted and click the Exit icon to shutdown the system.

Completing the Re-Sizing

  • Once the virtual machine has powered off, re-configure the hard disks to use the newly created/copied disk as the primary and remove the old primary disk from the system; finally, unmount the System Rescue ISO from the CD-ROM.
  • Power on your new VM and you should be presented with the the usual Windows boot sequence; if you are just presented with a black screen with a flashing cursor at the top left-hand corner of the screen, there isn’t a boot sector on the disk, so restart gparted and add the boot flag as directed above.
  • Hopefully, your virtual machine will start without issue. Windows may perform a check of the disk during boot. Once logged-in, open Windows Explorer and confirm that the newly created drive is the new larger size.

The procedure described above has been tested on Windows Server 2003 and works without issue (although the first time around I forgot to apply the boot flags…), so it should work seamlessly on Windows XP, Vista and Windows Server 2008.

I appreciate that this procedure does involve running a flavour of Linux to acheive the desired results, however its very straightforward and shouldn’t be off putting to a Linux novice.

Reblog this post [with Zemanta]

Sun’s VirtualBox Rocks – Beats VMWare and VirtualPC anyday

Sun xVM VirtualBoxI’m an avid user of virtual machines, primarily for development work on the desktop, but also in the Enterprise. For desktop virtualisation I’ve tried them all – Microsoft’s Virtual PC, VMWare Server and I’m now hooked on VirtualBox, Sun’s open-source offering to the gods of virtualisation. The performance is excellent, it ‘feels’ like a stable product and is actively maintained with regular releases.

For me, Virtual PC never felt stable enough and when running several VM’s at once to test clustered BizTalk installations – I could never get the desired performance. I moved to VMWare’s free VMWare Server which felt a lot more stable and ran quickly, but thrashed I/O. After reading Tim Anderson’s glowing blog post on VirtualBox a good few months ago, I decided to take the plunge and have never looked back.

Restoring a VM from a saved state and saving itself is blisteringly quick – much quicker than either VMWare or Virtual PC; the VM’s themselves are rock solid, even after being started and stopped several times during a working week and don’t cause the same I/O problems previously experienced. The admin ‘console’ is based on the Trolltech Qt tool set and although slightly different to VirtualPC and VMWare products it is intuitive annd easy to use. More importantly, VirtualBox can read VMWare disk images (and with some work, VirtualPC images), so no need to re-create all of those environments!

VirtualBox was originally developed by Innotek GmbH, but was acquired by Sun earlier in the year to form the desktop element of the company’s xVM virtualisation strategy. There doesn’t appear to be a development roadmap available on the website, but they have an excellent release cycle with regular bug and stability fixes. All in all, an excellent product that gets the seal of approval from this blogger.

If you’re interested in trying out VirtualBox, head on over to the downloads page and grab a copy of their latest release. Let me know how you get on!

Additional VirtualBox Reading on this Blog

You may be interested in reading some of my other VirtualBox related posts:

Cross-Application Subscription

Applications in BizTalk 2006 for me are just logical buckets that allow you place like-minded artifacts (maps, schemas, orchestrations etc.) together, so your environment when viewed through the BizTalk Admin Console looks clean and tidy and can be easily managed.

Although resources (BizTalk Assemblies) and ports can be moved between applications, they cannot exist in multiple applications at the same time*, so is it possible to have one application respond to events caused another application? Yes it is, through cross-application subscription.

If you create the most basic of subscriptions: a receive port/location and a send port, subscribed to the receive port on the ReceivePortName property; stop the send port (but leave it enlisted) and push a message through. The message will suspend because it is waiting for the send port to be started, but this gives us an opportunity to look at the context properties for the message (click on the image for a larger version):

Looking through the context properties (both promoted and non-promoted), there is no property for the originating application, or any ‘special’ properties that only the internals of BizTalk understands such as those seen in messages traversing request/response ports.

Given that applications are these ‘logical buckets’ and that they sit above the Message Box and the subscription engine, there is nothing stopping us therefore in subscribing to messages in ‘Application B’ that originated from ‘Application A’. This means we can quite easily perform cross-application subscription:

In a new application, create a send port that will subscribe to the ReceivePortName property as we did above and start it; drop a new messages in and you should now receive two output copies of the message, processed by different applications!

There is at least one drawback I can see here: Orchestrations in Application B still won’t be able to be bound to Receive Ports in Application A as the Admin Console won’t let you (without some brave database hacking…); it would however work if Orchestration receive ports were directly bound to the Message Box.

I can see that this approach could have beneficial uses across business-streams, or an ESB, where the on-ramp functionality lives in one application and end-point subscriptions live in other, separate applications.

Any other drawbacks or use-cases that I’m missing here?

* this isn’t necessarily true, as applications can reference other applications.

Which Host does a Dynamic Send Port Use?

Something I’ve never come across before – which Host does a Dynamic Send Port use? There is no value displayed under the Handler column for a dynamic Send Port:

Dynamic Send Port - No Send Handler Configuration

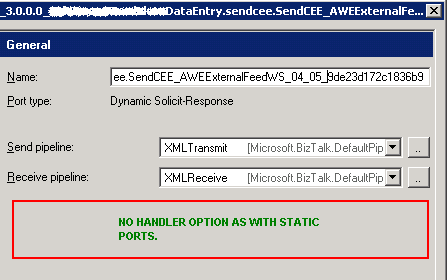
Also, when you look at the configuration for a dynamic Send Port (in this case a dynamic HTTP port), there is no drop-down option for the Handler:

Send Port Configuration - No Handler Option

So, Which Host does a Dynamic Send Port use?

After some digging and testing, it became apparent that the Dynamic Send Port runs on the default Host configured for the adapter that is being used; in our case, the Dynamic Send Port was running the HTTP adapter, do a quick look in the Admin Console reveals we are running the Sender Host as our default HTTP adapter host:

Default Adapter Host

In researching for this blog entry, I’ve also come across this discussion on the topic. Jan Eliasen raises the interesting point of this design – we are tied to using the same default Host for each dynamic port that uses the same adapter, which could cause separation of concern issues with bigger systems. There are also possible configuration headaches: when using the SMTP adapter for example, you are tied to using the same adapter settings for each Dynamic Send Port – e.g. SMTP server name & authentication!