Installing Redis Cache Locally in a Development Environment

I recently blogged about using the excellent Redis Cache – which is now the preferred Azure caching solution – for a recent CRM integration project.

In my development environment, I’m pointing against the Azure Redis Cache and while performance is fantastic, I recently saw that Chocolatey have an MS Open Tech version of Redis in their repository that I can run locally in my development environment.

I wondered whether I could easily use the Chocolatey version as a direct drop-in replacement for Azure Redis and even better, eek more performance out of a local install, especially to increase the speed of my unit-tests. The answer is ‘yes you can’ on both points.

Installing Redis via Chocolatey

With Chocolatey installed, we can go ahead and install Redis by issuing the extremely simple command from an Administrator Command Prompt:

Chocolatey - Redis Install Command

As we’re using defaults, Chocolatey will install Redis into C:\ProgramData\chocolatey\lib\redis-64.2.8.17 (note that the version number might change for you if you try this with later versions) and a shim into the C:\ProgramData\chocolatey\bin directory (the shim is a link that points to the actual .exe in the lib directory when the installation package contains .exe files and not an MSI file):

Chocolatey - Redis Install Screenshot

Configure and Start Redis

Due to Redis’ dependence on the Linux fork() system call, the Windows version has to simulate fork() by moving the Redis heap into a memory mapped file that can be shared with a child process. If no hints are given on startup, Redis will create a default memory mapped file that is equal to the size of physical memory; there must be disk space available for this file in order for Redis to launch.

During fork() operations the total page file commit will max out at around:

(size of physical memory) + (2 * size of maxheap)

For instance, on a machine with 8GB of physical RAM, the max page file commit with the default maxheap size will be (8)+(2*8) GB , or 24GB.

If you don’t give any hints to Redis, you get an error similar to the following:

The Windows version of Redis allocates a large memory mapped file for sharing
the heap with the forked process used in persistence operations. This file
will be created in the current working directory or the directory specified by
the ‘heapdir’ directive in the .conf file. Windows is reporting that there is
insufficient disk space available for this file (Windows error 0x70).

You may fix this problem by either reducing the size of the Redis heap with
the –maxheap flag, or by moving the heap file to a local drive with sufficient
space.
Please see the documentation included with the binary distributions for more
details on the –maxheap and –heapdir flags.

Redis can not continue. Exiting.

To get around this limitation, specify the –maxheap flag when starting Redis, using a value that is relevant to your machine:

redis-server –maxheap 1gb

which will successfully start Redis:

Redis Server - Started

Allowing us to connect to the local Redis server with a connection string similar to the following:

“localhost:6379,ssl=false”

Note that Redis will create the memory mapped file on your file-system at %USERPROFILE%\AppData\Local\Redis that is the size you specify with the –maxheap flag.

Redis Memory Mapped File

Shuting down the server (Ctrl+C in the command prompt window where Redis was started) deletes the file.

Performance Testing

So, what is the performance difference between Azure Redis and a local install of Redis? I created a simple console test app that would create 1000 cache items (integers) and then retrieve the same 1000 cache items; the cache is flushed before I execute each test.

The following results are based on the console test app running locally against my development VM.

Executing against a local Redis instance (all times in ms):

Run 1 Run 2 Run 3
Iteration 1 2515 2799 2526
Iteration 1 2380 2285 2380
Iteration 1 2234 2703 2641
Avg: 2495

Executing against an Azure Redis (1Gb Standard Pricing Tier) instance (all times in ms):

Run 1 Run 2 Run 3
Iteration 1 47955 45139 45725
Iteration 1 48549 47773 46422
Iteration 1 45311 49194 46144
Avg: 46912

I was quite shocked at just how slow the same test was against the Azure Redis instance (2.495 seconds vs. 46.912 seconds). So, to investigate whether this issue was network latency, I tried the same test running on a basic A2 Azure VM (Windows Server 2012, 2 cores, 3.5 GB memory) in the same region as the Azure Redis Cache:

Run 1 Run 2 Run 3
Iteration 1 1211 1185 1186
Iteration 1 1439 1257 1245
Iteration 1 1343 1187 1196
Avg: 1249

The results indicate that executing from the Azure platform to an Azure Redis cache executes faster than a simple install on my local dev. environment (2.495 seconds vs. 1.249 seconds). Kudos to Microsoft for such an excellent and performant service!

Serializing Custom .Net Types for use with the Azure Redis Cache

In my previous post I looked at a real-world example of using the new Azure Redis Cache. One thing that was missing was the storing of custom .Net Types as cache values, which we’ll look at here.

The RedisValue Type

The Microsoft Azure documentation recommends using the StackExchange.Redis API for accessing the Redis Cache. This API stores cache values within the RedisValue type, which has a number of implcit conversions from primitive .Net types (Int32, Int64, Double, Boolean etc.), but conversions from the RedisValue type to the primitive .Net type need to be made explicitily.

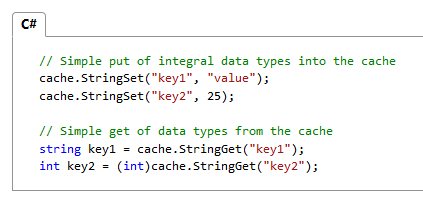
For example, setting an int as the cache value is implicit, while retrieving an int from a cache value needs to be cast (the following screenshot is from the MSDN documentation):

Cache Serializer - Get and Set of Primitive Types

In addition to the implicit/explicit conversion of primitive data types, the RedisValue type can store binary data as the cache value. This means that we can serialize a custom .Net type into a byte array and pass that as the cache value within the StringSet() method; we can then retrieve that cache value using the StringGet() method and deserialize the byte array back to the custom type.

To complete the serialization/deserialization, we need a helper class, which is shown below. This class is inspired by the sample on MSDN (Work with .Net objects in the cache) but is tweaked slightly:


/*
* A simple generic Serialization Helper allowing custom .Net types to be stored
* in the Azure Redis Cache. Inspired by the sample at:
* http://msdn.microsoft.com/en-us/library/azure/dn690524.aspx#Objects
*/
using System.IO;
using System.Runtime.Serialization.Formatters.Binary;
namespace AzureRedisCacheSample
{
public static class CacheSerializer
{
public static byte[] Serialize(object o)
{
if (o == null)
{
return null;
}
BinaryFormatter binaryFormatter = new BinaryFormatter();
using (MemoryStream memoryStream = new MemoryStream())
{
binaryFormatter.Serialize(memoryStream, o);
byte[] objectDataAsStream = memoryStream.ToArray();
return objectDataAsStream;
}
}
public static T Deserialize<T>(byte[] stream)
{
if (stream == null)
return (default(T));
BinaryFormatter binaryFormatter = new BinaryFormatter();
using (MemoryStream memoryStream = new MemoryStream(stream))
{
T result = (T)binaryFormatter.Deserialize(memoryStream);
return result;
}
}
}
}

Note that during deserialization, if the byte array is null, a default instance of type T will be returned. This caught me out when I was initially testing, so beware that it is returning the value you expect.

Using these helpers with the StackExchange.Redis API’s StringSet() and StringGet() methods to store custom .Net types makes life really easy:


var cacheItem = CacheSerializer.Deserialize<Guid>(cache.StringGet(cacheKey));
if (cacheItem == Guid.Empty)
{
// Cache item doesn't exist, retrieve Guid from source system.
// Add (serialized) Guid to the Azure Redis Cache with a lifespan of 90 minutes
cache.StringSet(cacheKey, CacheSerializer.Serialize(cacheItem), TimeSpan.FromMinutes(90));
}

To retrieve a custom type, we call the StringGet() method, passing the cache Key and deserialize the returned byte array into the .Net Guid type; In order to determine whether the cache item was found, I check whether the returned cacheItem equals Guid.Empty, which is the value returned by default(T) for the Guid type from the Deserialize() method.

To store a custom .Net type (in this case a GUID), call the StringSet() method and instead of passing a primitive type as the cache value, we serialize our cache item and pass the resulting byte array.

Azure Redis Cache – A Real World Example

Read the second post in this series: Serializing Custom .Net Types for use with the Azure Redis Cache.

I spend a lot of my time at the moment architecting and writing integration code against Dynamics CRM 2011 and 2013. My current project is based on Azure Worker Roles and sucks CRUD messages from an SFTP Server (yep, FTP), maps them to CRM Entities before finally calling the appropriate CRUD operation on the XRM Service Proxy with the new Entity instance.

I need to repeatedly retrieve an Entity Reference to common ‘reference’ data on Create and Update – data that is loaded once and hardly ever changes (such as Products, Agent Codes, Cost Centres etc.) At the moment, I’m hitting CRM each and every time I need to grab the Entity Reference, which isn’t particularly efficient, slows down the overall solution and will start to incur unnecessary Azure data-egress charges at some point in the life-cycle of the application.

Azure Redis Cache

The Azure Redis Cache is the new cache offering from Microsoft which supersedes the Managed Service Cache (an instance of the AppFabric Cache) and In-Role Cache (a cache based on Cloud Services).

The Azure Redis Cache is based on the open-source Redis cache, an advanced key-value cache and store. More information about the project can be found at http://redis.io/.

The Azure offering comes in two flavours: Basic (a single-node deployment, primarily for dev/test) and Standard (a replicated cache in a two-node primary/secondary configuration, with automatic replication between the two nodes (managed by the Azure Fabric) and a high-availability SLA, primarily for production use). For the purposes of this blog-post I am using a Basic instance.

A Real World Example

I use an Entity Reference Provider in my code which implements a bunch of simple methods to retrieve the Guid of the Entity I’m interested in – in the example below, I am retrieving the Guid to the Product Entity:

RetrieveProductEntityReference() Method - Pre Cache Implementation

In order to cache-ify this method using the Azure Redis Cache we first need to spin-up  a new instance of the Redis Cache in the Azure Portal (see Getting Started with Azure Redis Cache in the Azure Documentation for further information).

We then create a connection to the Redis Cache using the ConnectionMultiplexer.Connect() method. Be aware that calling this method is expensive and the resulting object should be re-used thoughout your code, hence why I create an instance in the constructor for the provider:

Entity Reference Provider - Constructor

That’s all the setup required to use the Azure Redis Cache and we can now concentrate on retrieving and storing values in our cache. At a high level, the approach will be:

  • Attempt to retrieve a Guid for the referenced Entity from the cache based on a specified cache key.
  • If nothing is found in the cache for the key, we will retrieve the value from XRM itself and then populate the cache with that value.
  • We will finally return the Guid (retrieved either from the Cache or XRM).

The full implementation of the reworked RetrieveProductEntityReference() method with a cache implementation is shown below.

Note that I am keeping things simple here and converting my Guid to a string and vice-a-versa (I plan on showing how to cache custom types in a separate post).

With a connection to the Cache we need to retrieve a reference to the cache database. The GetDatabase() method is a lightweight method call and can be performed as required:

RetrieveProductEntityReference - Breakdown-1

We then define a cache key and attempt to get the item from the cache that has that key:

RetrieveProductEntityReference - Breakdown-2

If the cache item is null, there was no item in the cache with the supplied key (either it has never been set, or a previous cache item with that key has expired).

RetrieveProductEntityReference - Breakdown-3

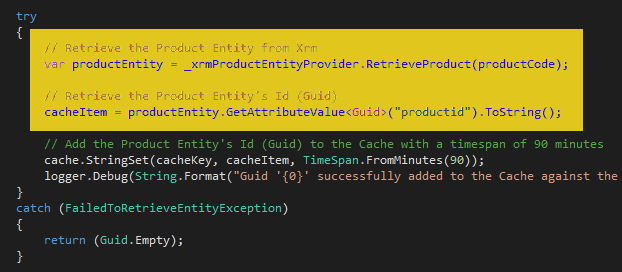
If that is the case, we go off and retrieve the actual Entity Guid from XRM and assign the Guid to the (previously defined) cacheItem:

RetrieveProductEntityReference - Breakdown-4

We then add the cache item (containing the newly retrieved Guid) to the cache using the cache.StringSet() method, passing the previously defined cache key, item and a timespan which defines when the item will expire in the cache (the expiry timespan is optional):

Finally, we return the Guid contained within the cache item which has either been retrieved directly from XRM or the cache itself:

RetrieveProductEntityReference - Breakdown-6

A Performance Improvement?

Just to give you an idea of numbers, using a very small test sample of 50 iterations over this method, retrieving from the cache takes (on average) 32ms, while hitting the XRM Service Proxy takes 209ms (we are hitting Dynamics CRM 2013 Online).

Putting this into context, if I didn’t use the cache, it would take me 10.45 seconds to perform 50 iterations of this method, vs. 1.8 seconds for the cache implementation (which includes the initial hit to retrieve the data from XRM).